How to create an on-demand virtual class.
Prerequisites for Creating an On-demand Class
Before creating your class, make sure that you have the following prerequisites defined.
The instructor is defined as a user.
Your lab template is published.
Optionally, if you are going to use a library to push files to the instructor and student desktops, it is helpful to create your library first. This can also be done after the class is created.
NOTE: On-demand classes in OrasiLabs are designed to be asynchronous and do not require instructor presence when the students are active. We allow instructors to be defined for on-demand classes so that it is clear who has overall responsibility for each class and someone can access student labs if necessary. However, on-demand classes will start and end automatically based on class dates, and students can start and stop their own labs.
In addition to creating a class via the Class Wizard, you can also copy an existing class. For complete details, refer to the article Copying an Existing Class.
Using the Class Wizard
The Class Wizard will walk you through the steps to create your class.
Invoke the Class Wizard
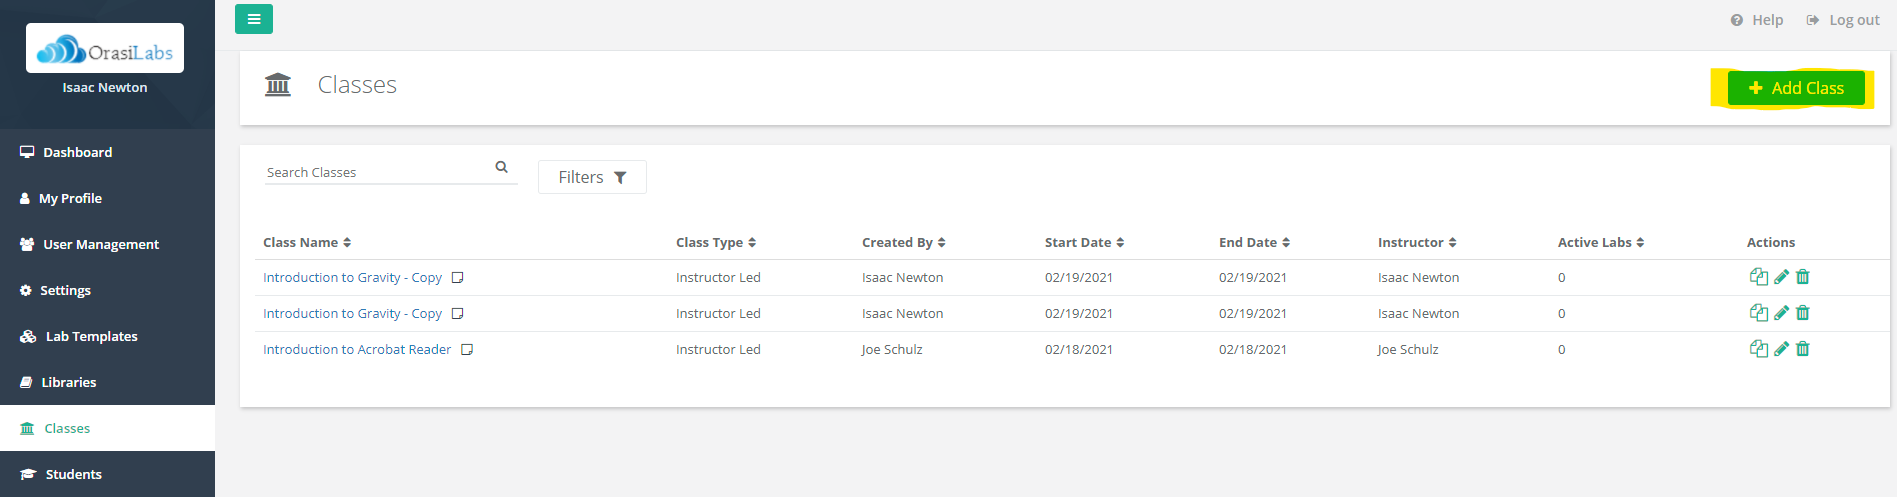
Invoke the Class Wizard by selecting +Add Class from the Classes list.
Step 1 - Basic Class Information

Provide the Class Type, Name, optional Description, Class Schedule (Start Date, and End Date), and Time Zone. For on-demand classes, the start and end dates are used to automatically start and end the class.
Select Next to advance the wizard.
Step 2 - Lab Management

Specify the lab template that will be used to create the class labs. Any published templates that you have access to can be selected.
Role
You must also specify the role of each template. The following options are available:
Student - creates a lab matching this template for each student. This is the most common choice for an on-demand class. Choose this option if students will have a lab but instructors will not.
Instructor & Student - creates a lab matching this template for any instructors as well as each student.
Instructor - creates a lab matching this template for each instructor.
You can have more than one template specified for each class. For example, if the student and instructor machines need to be different, you could have one template for the instructor and then another for the students.
Actions
Class labs will pause based on the lab template inactivity settings. You can view and modify these settings with the clock icon in the Actions columns. If the Inactivity Timeout is turned off, the class labs will not pause.
After adding your lab template, select Next to advance the wizard.
Step 3 - Class Participants

Instructors and students are added in Step 3: Class Participants. Instructors are optional for on-demand classes but can be defined if someone will be monitoring the student labs.
Assign Instructors will present the list of users that can be assigned as an instructor. If only one instructor is selected, that instructor will be the primary instructor. If more than one instructor is chosen, the user will be prompted to chose the primary instructor. While all instructors will have full access to deliver the class, the primary instructor is listed as the instructor in the student registration email. Students will see the names of the primary instructor and any additional instructors on their Classroom page.

Students can be added using any of the following methods:
Enter a student's email address and select Add Student. As student email addresses are entered, existing students that already exist in OrasiLabs will appear and can be selected. If the email does not match a student already in OrasiLabs, the email will be added to the list of registered students and you can add the additional details (First Name, Last Name, and Phone). This is the best option to use if you are registering individual students or students that have not previously taken a class.
Select + Existing Students and select from the list of previously registered students. This is the best option to use if you are registering multiple students that have already been added to the main Students list available from the left-hand menu.
Select Bulk Import to import students from a CSV file.
Registered students will appear in a list under Students.
One of the biggest differences between instructor-led and on-demand classes in OrasiLabs is each student can have different start and end dates. On-demand classes typically run for a longer duration and each student is registered for specific dates within that timeframe.

As the students are entered, their Start Date and End Date will default to the class dates entered in Step 1. Student dates can be changed by modifying the default dates as needed. Student start and end dates must be within the start and end dates of the class.
Each student will automatically receive a registration email. In addition to the basic class logistics, the email also includes a calendar invite, detailed instructions, a link to a connection test, and a student-specific link to join the class. If you do not want OrasiLabs to automatically send the student registration emails, look for the Automatically Send Invite Emails option in Step 4 - Other Settings/General Class Settings
If you need to add additional students later, you can edit the class.
Once your instructor(s) and students are added, select Next to advance the wizard.
Step 4 - Other Settings

There are optional settings that can be added to a class in Step 4.
Libraries

Libraries contain files that will be pushed to the instructor and student labs and/or to the Student Classroom page.
Each library sent to the participant labs will create a folder inside of a Class Files folder on the desktop of the class labs. Libraries sent to the Student Classroom page will be added as a folder to the Class Materials tab.
By default, any files in the selected libraries will automatically be available in their intended location. If you want to manually send the files during class, you can deselect the option to have the files automatically available.
General Class Settings

General Class Settings contains miscellaneous settings that can be used to customize the specific behavior of the class. The setting available to on-demand classes is:
Allow Student Emails to Instructors - allows students in an on-demand class to use their Request Help button to send an email to the instructor(s).
Automatically Send Invite Emails - controls automatically sending student invitation emails. If this option is disabled, you are responsible for sending your own student invitation emails. You can use the Download Student List option on the Class Delivery or Class Edit page for a list of all student registration information.
NOTE: The envelope icon next to the student name can still be used to send an invitation email to the student regardless of this setting. This only controls the automatic email that is sent when the student is registered.
Limit Student Classroom Hours - allows a limit to be set on the number of billable classroom hours for students in the class. For complete details, please refer to the article Limiting Student Classroom Hours.
Notifications
In addition to the automatic registration email that students receive, you can configure optional notifications.
For example, you can notify students of the required pre-work to do before the class or send a follow-up email after the class ends.
You can find additional details to create these notifications in the class notifications article.
After adding your optional settings, select Next to advance the wizard.
Step 5 - Finalize
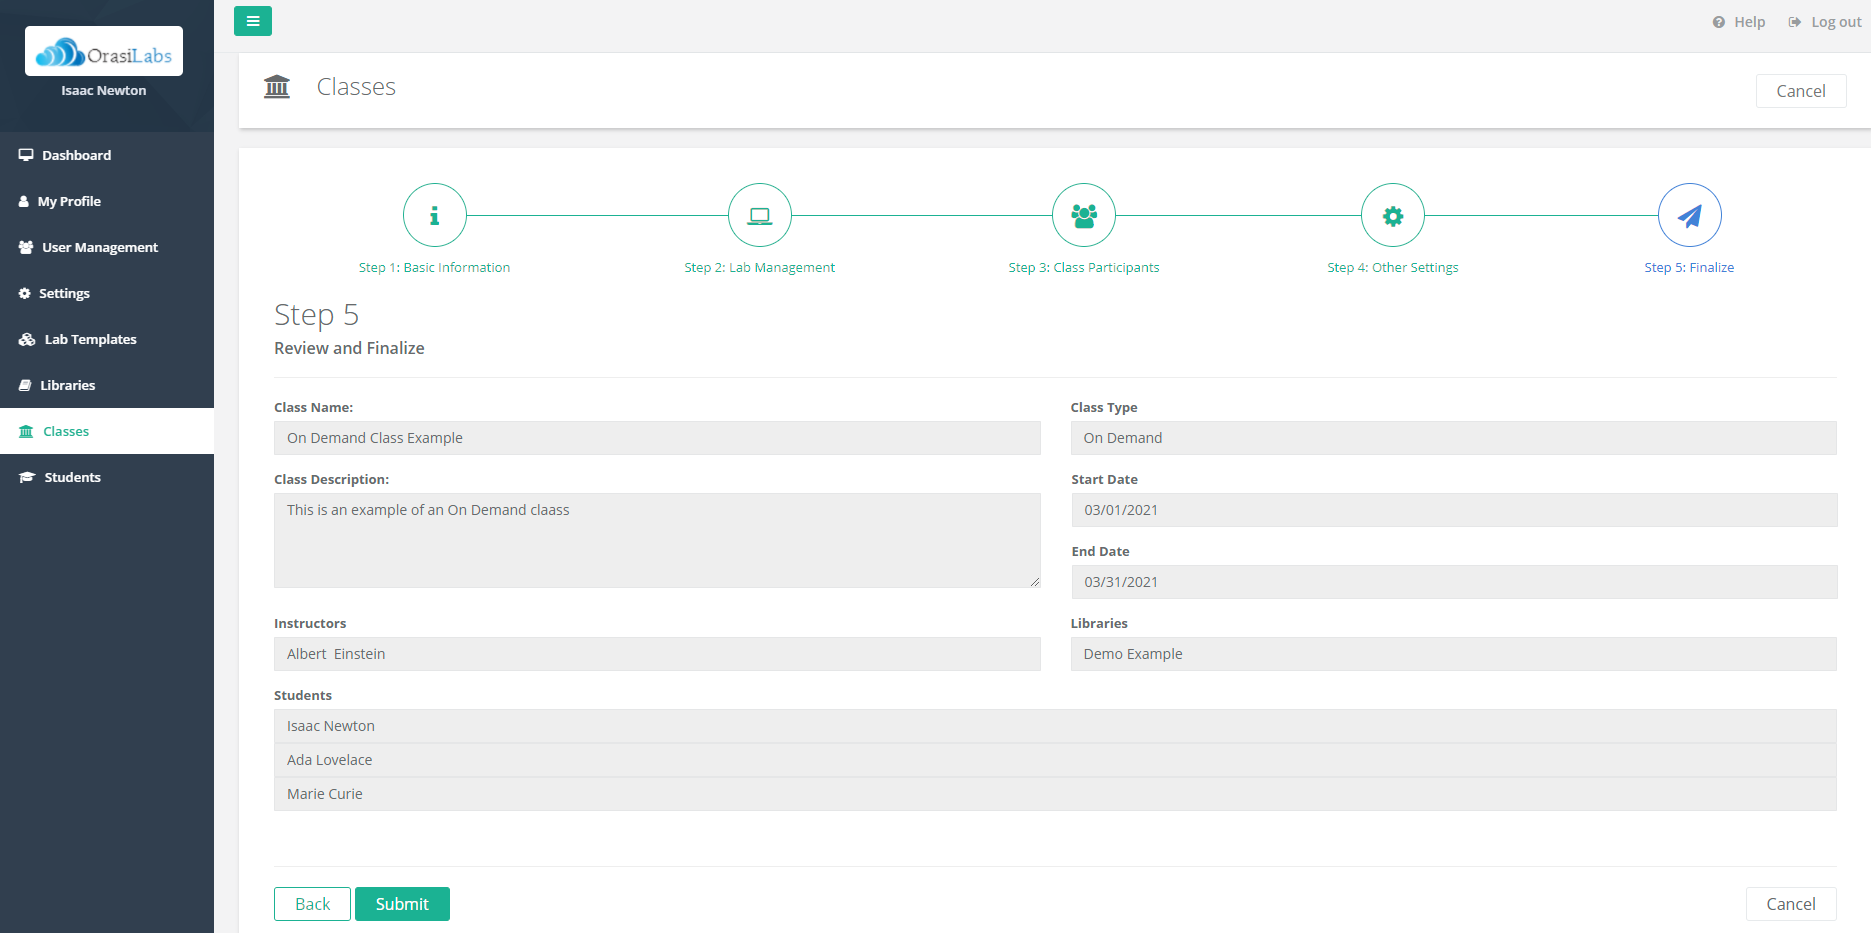
The last step is to review and finalize the class definition. The Class Wizard will display the previous selections. If you want to modify any selections, select Back or navigate to previous steps using the step icons at the top of the page.
Once the options look correct, select Submit to create the new class.
Your class is now created and will appear in the list of classes.
Where to go next...
Was this article helpful?
That’s Great!
Thank you for your feedback
Sorry! We couldn't be helpful
Thank you for your feedback
Feedback sent
We appreciate your effort and will try to fix the article