How to create a new lab template using the graphical designer.
Lab templates can be created in several ways. For single-image lab environments, the Lab Template Wizard provides a quick and easy way to build new lab templates from base images or from other lab templates. For more complex environments, however, the Lab Template Designer provides a graphical interface to define the required components.
Using the Lab Template Designer
Start the Lab Template Wizard
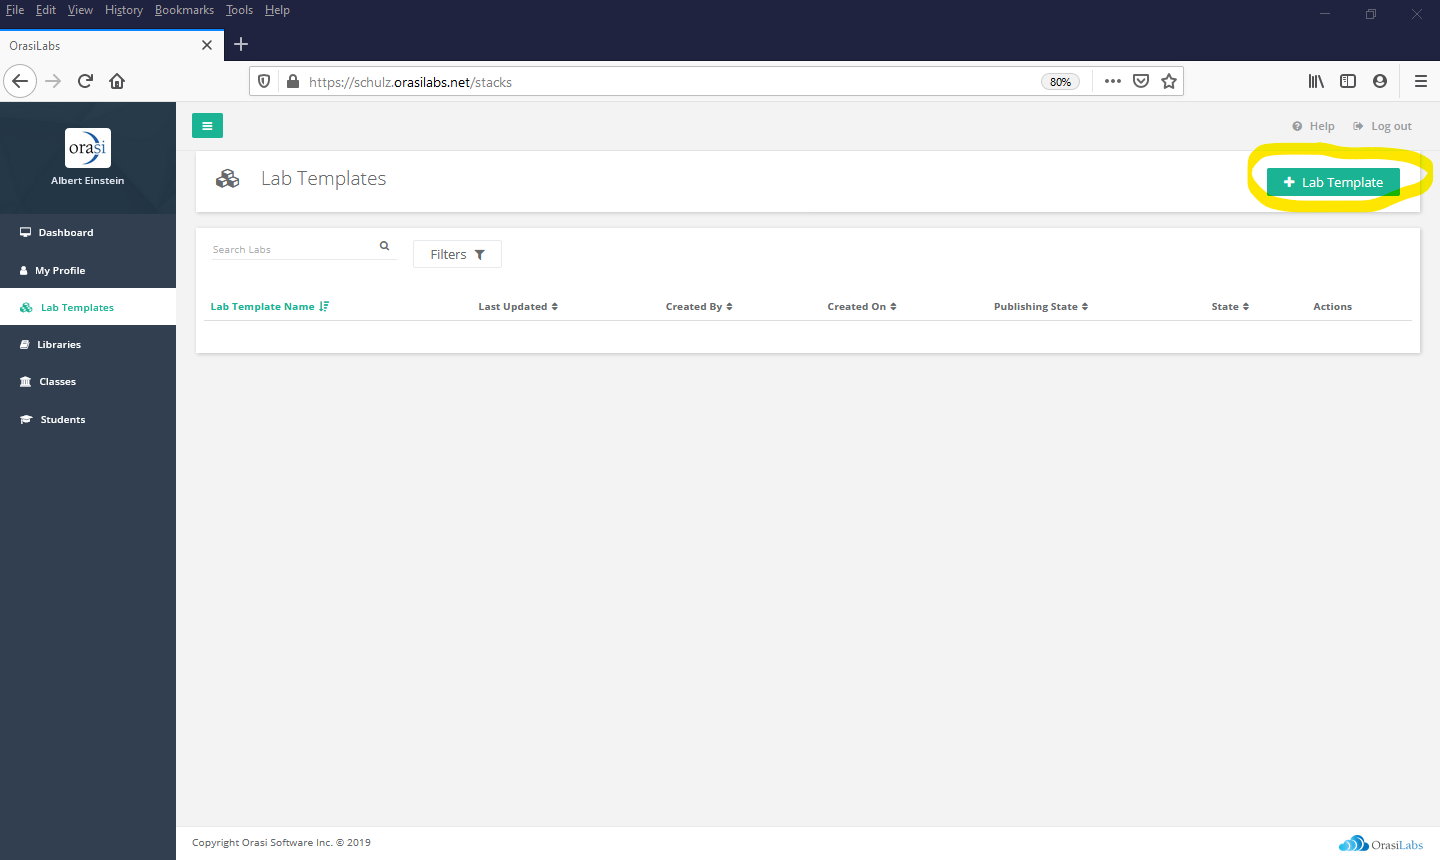
To use the Lab Template Designer, you must first invoke the Lab Template Wizard to fill in the basic information. Start the wizard by selecting +Lab Template from the Lab Templates list. Alternatively, you can also invoke the wizard by selecting +Create on the Onboarding Status widget in the Dashboard.
Enter Basic Information

First, provide basic information about the new lab template object, including the name, and description. The lab template name must be unique within the OrasiLabs tenant in which you're working.
You must also specify the access permissions to apply to this lab template. These permissions govern who can view, copy, or modify the template once it's created. The default permission is Copy.
You can also use this step to create and/or assign labels to the template for easy identification and filtering. These labels will be displayed in the Lab Templates list once the template is created.
Finally, select Next to advance the wizard.
Open the Lab Template Designer

Now, rather than selecting a base image or copying an existing template from the wizard lists, select Lab Template Designer to open the graphical template designer.

The Lab Template Designer is a visual interface used to graphically design a complex lab template. Unlike the Lab Template Wizard, which is limited to just one base image or source template, the Lab Template Designer can be used to add any number of lab template components to the environment. Once created and used to deliver a class, instructors and students will have access to all of the resources within the lab template.
Add Lab Template Components

To add lab template components to the lab template, drag the corresponding resource icon from the palette on the right to the design space on the right. Any number of components can be added to a lab template. Lab template components can either be visual resources (base images or server-based templates) or non-visual resources (databases, ports, firewalls, and storage devices).
Let's look at an example of a complex environment. Let's assume that each student in a class will need access to a Linux application server, a Windows client, and a relational database server. All of the objects in the template must be able to access one another and, in addition, the Linux application server must be able to be accessed remotely through the internet.
In an example like this, you would first begin by dragging the required template components from the resource palette to the design space. This example requires 4 resources, including 2 servers, 1 database, and 1 external port. The graphic above depicts such an example.
Now, for each resource, you need to enter detailed properties that determine the resource size and run-time characteristics. The required properties differ by resource type but all required properties must be specified before the lab template can be saved.
Server Resources
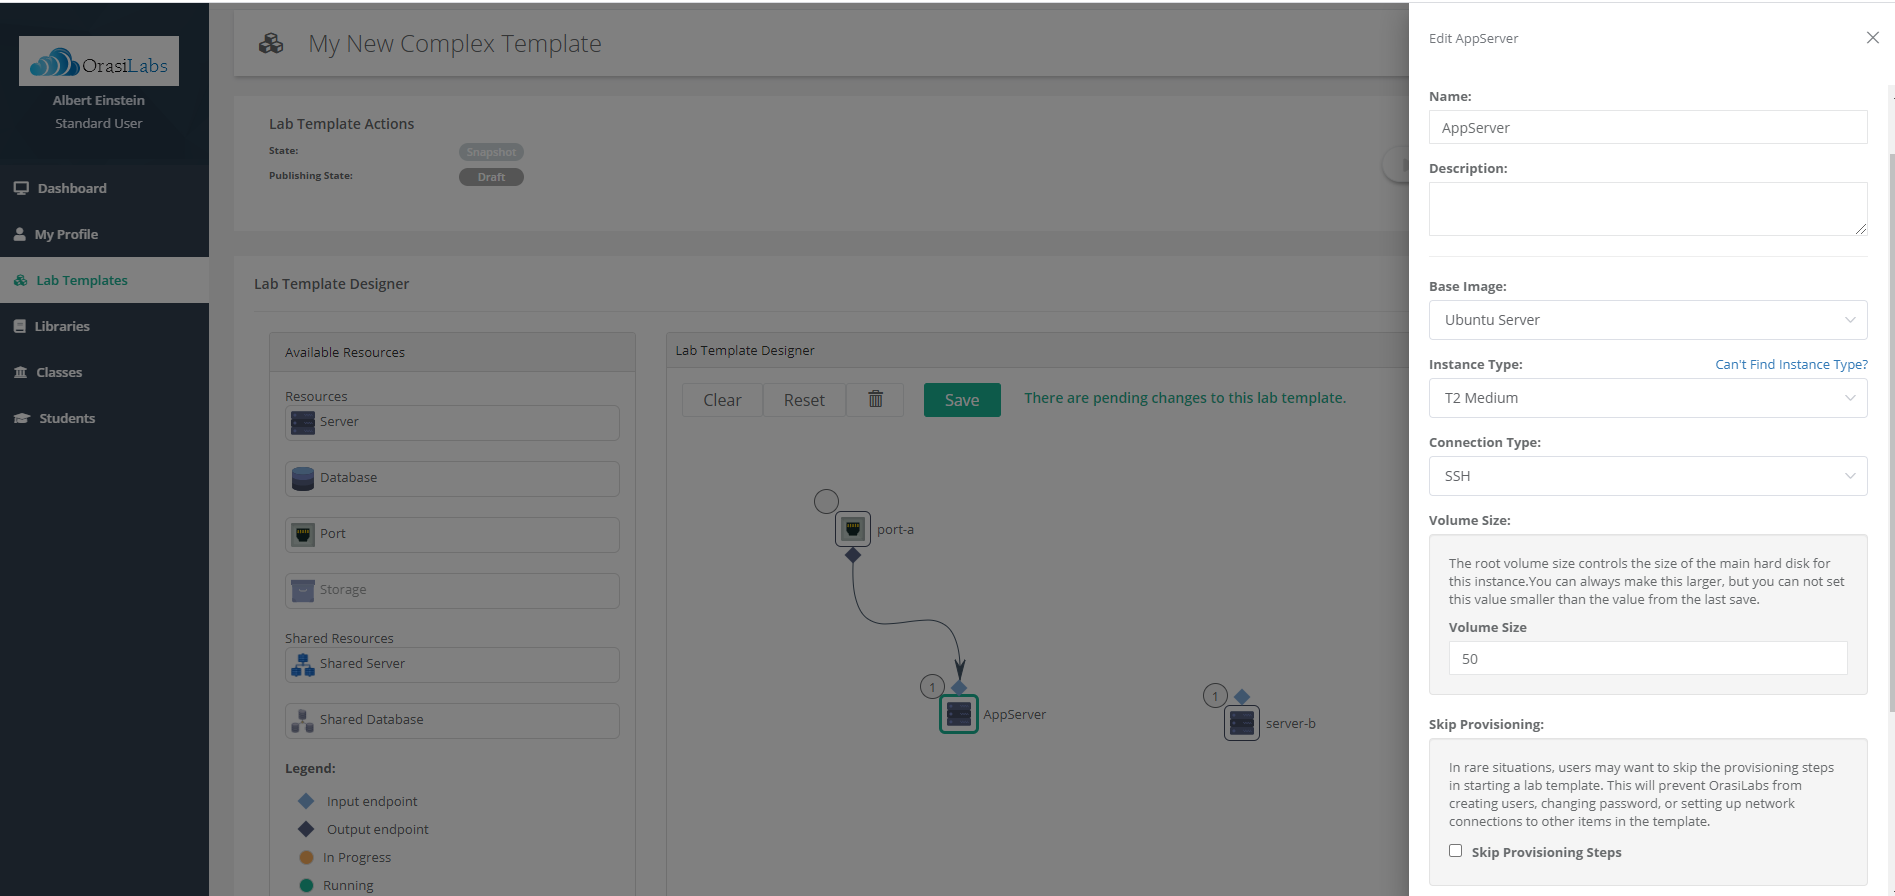
Server resources represent virtual machine images that run an operating system. For server resources, the details determine the resource name, instance size, base image, connection type, and volume size. Double-click on the desired resource to add the detailed properties in the pop-out dialog that will appear.
In our example, the first resource is the Linux application server. From the details in the graphic above, we can see it will be a "T2 Medium" instance of Ubuntu Server named "AppServer". The lab will connect to the resource using SSH. The resource will also be provisioned at the default size, 50GB.
NOTE: To connect from one template resource to another, participants use the syntax "<resource name>.local" where <resource name> is replaced with the name of the resource from the Lab Template Designer. In the scenario above, for example, participants would connect to this server with the name "AppServer.local". This Connection URL can also be viewed from the Lab Template Details in the Template Resources table.

The second resource in our example is the Windows client. From the details in the graphic above, we can see it will be a "T2 Medium" instance of Windows 2016 Server named "Client". The lab will connect to the resource using RDP, and it will also be provisioned at the default size of 50GB.
Database Resources

The third resource in this example is the relational database server used by the Linux application server and/or Windows client. Database resources represent a non-visual database manager that runs as a shared object in the lab template. Database resources are automatically available to all of the server resources in the template using a generated URL and login credentials.
From the details in the graphic above, we can see that in our example the database server will be a "T2 General Purpose Small" instance of MySQL named "mysql-db".
NOTE: To connect from one template resource to another, participants use the syntax "<resource name>.local" where <resource name> is replaced with the name of the resource from the Lab Template Designer. In the scenario above, for example, participants would connect to this database server with the name "mysql-db.local". This Connection URL can also be viewed from the Lab Template Details in the Template Resources table.
Port Resources

The final resource in our example is an external port. All of the components within a lab template are automatically visible to one another. So, you do not need to add any networking resources in order to access the application server component from the client component.
However, we also mandated that the Linux application server must be accessible from the internet. In order to accomplish this, you will need to add an external port resource connected to the Ubuntu Server resource. You connect a port to a server by dragging a line from the diamond icon at the bottom of the port resource to the diamond icon at the top of the related server resource. As we can see from the details in the graphic above, once the port resource is connected to the server, anyone on the internet can access the server component through SSH on port 22.
Shared Resources
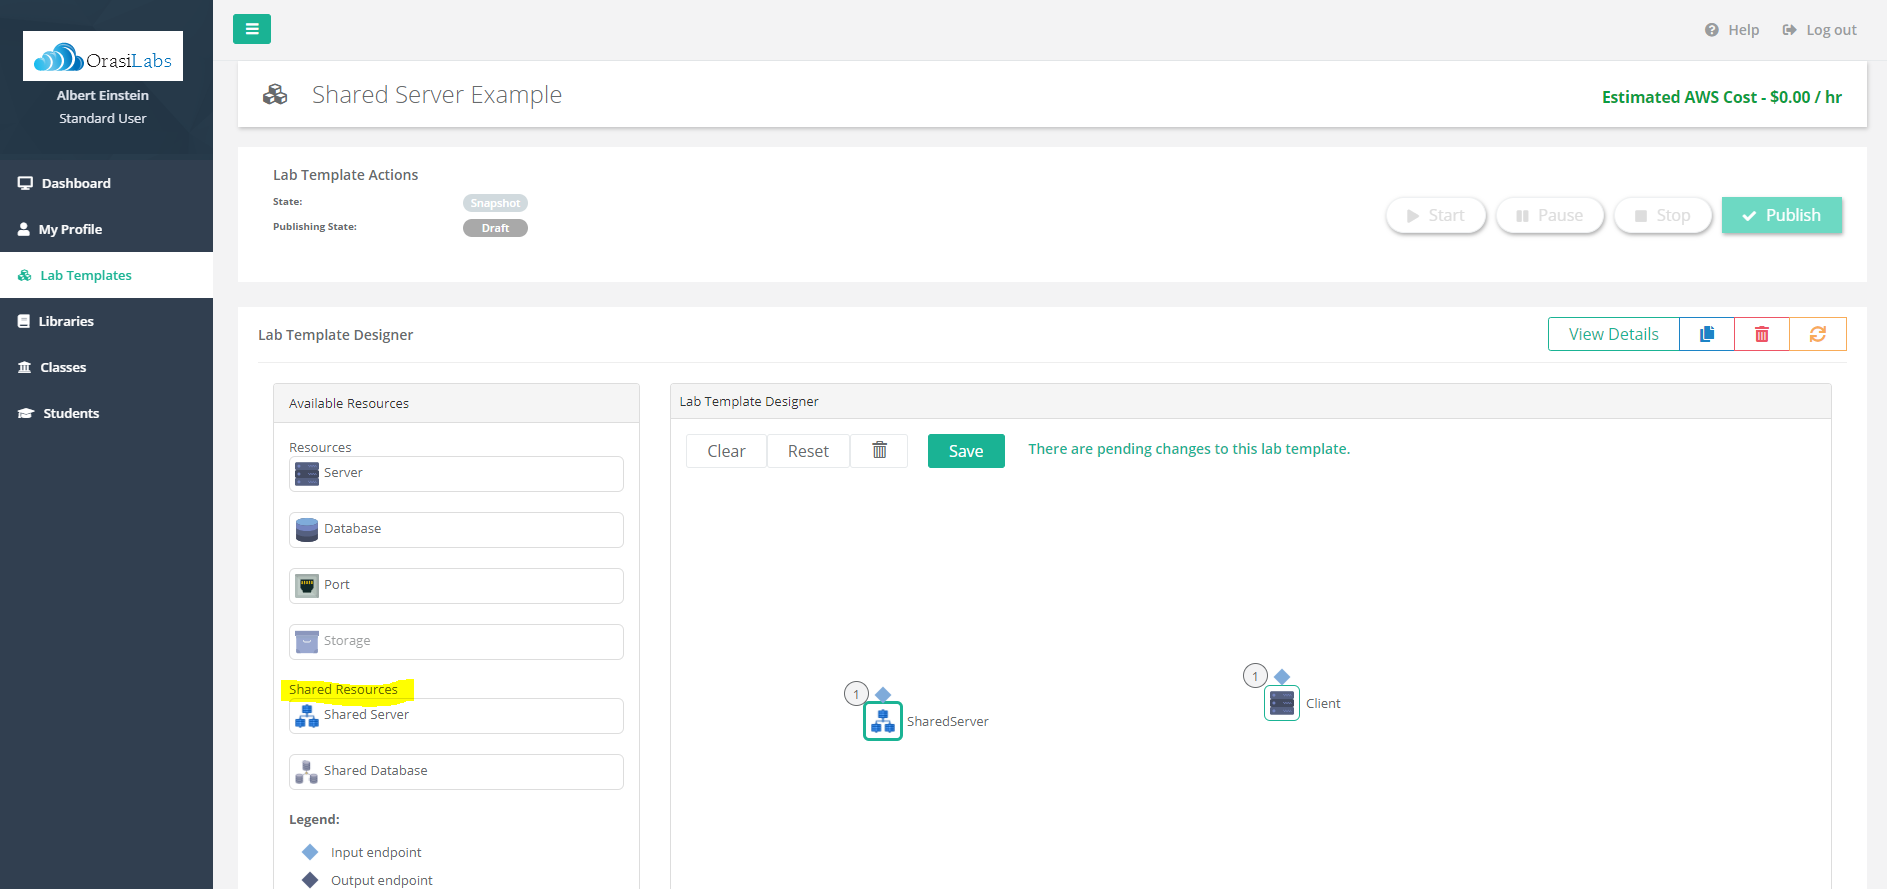
If the template is going to be in a class where all participants will connect to the same server or database resource, Shared Server and Shared Database can be selected from the list of Available Resources. Adding a Shared Server or Shared Database to a template will allow all participants of an instructor-led class to connect to and share the same server or database.
NOTE: To connect from one template resource to a shared template resource, participants use the syntax "<resource name>.shared" where <resource name> is replaced with the name of the resource from the Lab Template Designer. In the scenario above, for example, participants would connect to this shared database server with the name "SharedServer.local". This Connection URL can also be viewed from the Lab Template Details in the Template Resources table.
NOTE: Templates containing Shared Resources can also be used in on-demand classes. However, since each participant in an on-demand class can have different start and end dates, each participant will receive their own unique instance of the "shared" resources.
Save the Lab Template

At any time during a design session, you can use Start Over to remove all existing components from the design space or Reset to undo any changes made since the last save operation. You can also selectively delete individual resources by highlighting a resource in the design space and selecting the trash can icon.
After all of the required components are added to the lab template and the details are specified for each, you can save the new lab template by selecting Save.

Congratulations! You've just created a new lab template. You can now use this lab template as the basis for other templates or publish it to deploy a new class.
Where to go from here...
Lab Template Overview
Creating a Lab Template with the Lab Template Wizard
Copying an existing Lab Template
Customizing a Lab Template
Publishing a Lab Template
Lab Template Permissions
Lab Template Labels
Deleting a Lab Template
Was this article helpful?
That’s Great!
Thank you for your feedback
Sorry! We couldn't be helpful
Thank you for your feedback
Feedback sent
We appreciate your effort and will try to fix the article